Mirrors#
Package Security Manager (On-prem) enables you to create a local copy of a repository so users can access approved software components from a centralized on-premise or cloud location.
Mirrors are contained within channels in Package Security Manager. Therefore, you must have a channel established before you can create a mirror. Anaconda recommends channels contain only one mirror each to prevent conflicts between package sources and mirror filters. For more information on channels, see Channels and subchannels.
- Allowlist the following URLs before attempting to mirror:
Mirror filters#
Adding filters to your mirrors ensures that you only mirror the packages that you need in your channel. This ensures that everyone on your team is not only using the same packages, but also the same version of those packages for the same operating system architecture. You can also filter by license and common vulnerability and exposure (CVE) score/status to ensure that you are meeting your organization’s software security requirements. For more information about CVEs, see Common Vulnerabilities and Exposures (CVEs).
Note
Filters can also be applied to channels, and can be applied in both standard and air-gapped environments.
Caution
The mirror filter should not contain configurations that will conflict with the channel filter. If you attempt to mirror packages of a type not allowed by the channel filter, no packages will be mirrored.
Creating a mirror#
Mirroring via the graphical user interface (GUI) is the most common method for mirror creation.
When creating a mirror, Anaconda recommends that you freeze the channel, create your mirror, allow it to complete, then unfreeze the channel. For more information on freezing and unfreezing a channel, see Freezing/Unfreezing Channels.
To create a mirror:
Log in to Package Security Manager as an administrator.
Select a channel you want to contain your mirror.
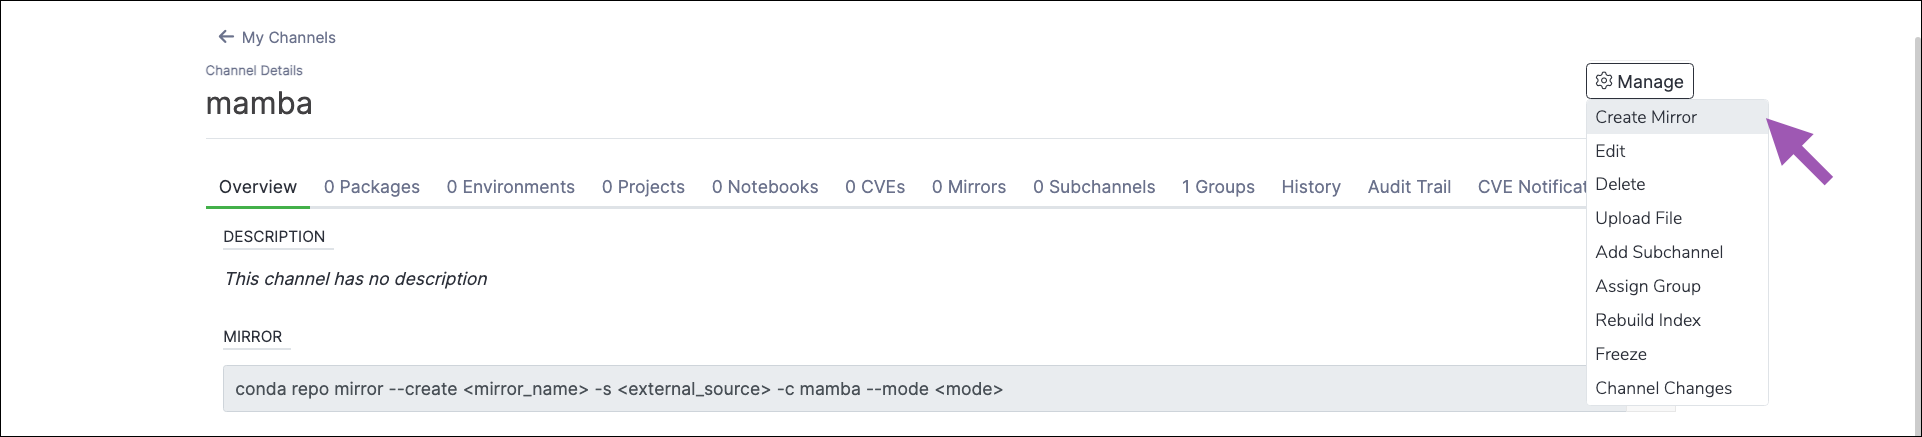
Open the Manage dropdown menu and select Freeze.
Open the Manage dropdown menu and select Create Mirror.
Complete the Create mirror form.
Allow the mirror time to complete.
Open the Manage dropdown menu and select Unfreeze.
Create mirror form#
The Create mirror form allows you to set the configurations for your mirror’s allowed packages. Let’s take a look at the different parts of the mirror form and what configurations they control.
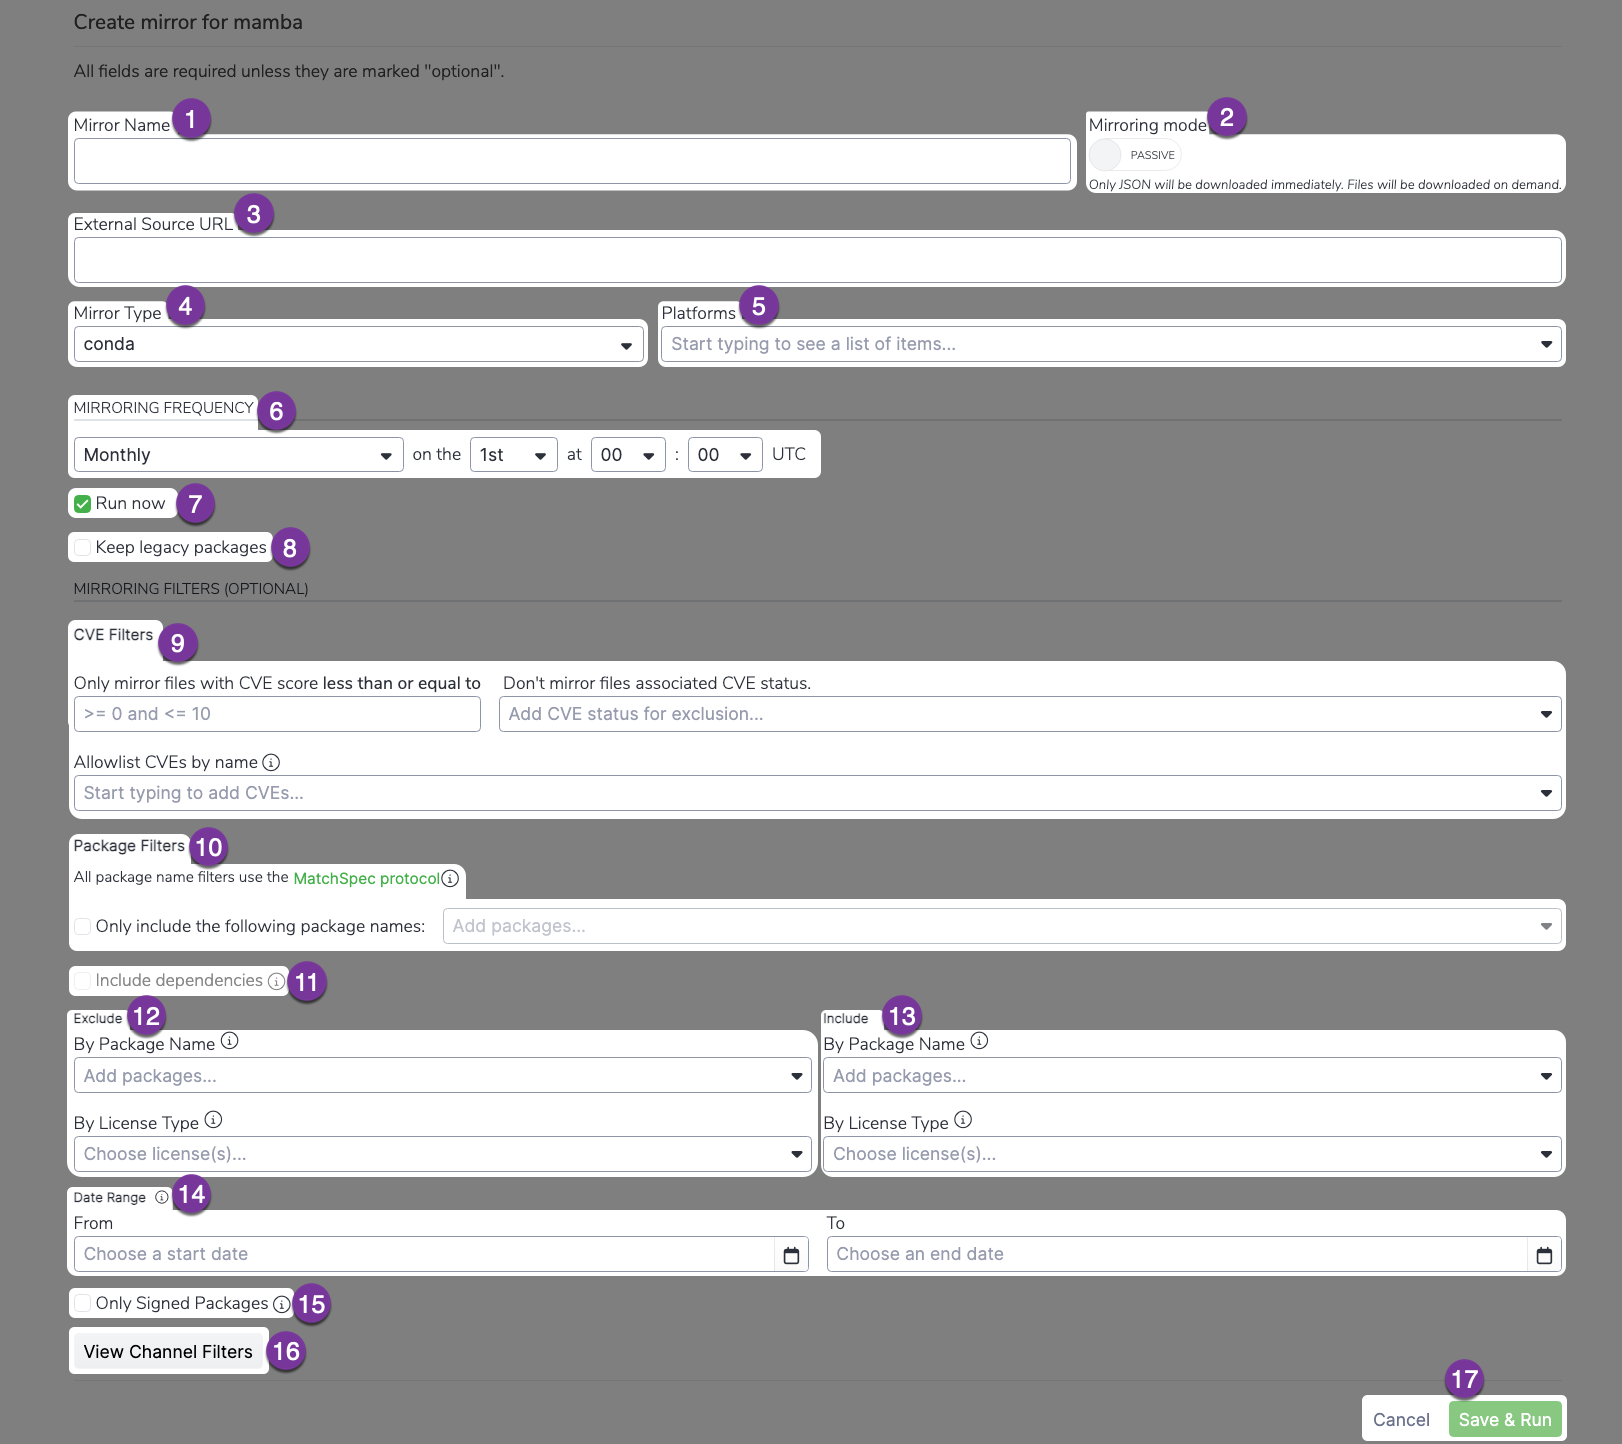
- Mirror Name
Enter a name for your mirror. Anaconda recommends you name your mirror something descriptive for your end users. For example: “main_channel_no_filters” or “approved_software”.
- Mirroring mode
Choose whether you want your mirror to be active or passive.
Active mirroring
Active mirroring will download all the packages not filtered out of your mirror immediately to your local server. These mirrors can be extremely large in size; the Anaconda’s public repository is 700GB, the conda-forge repository is 3TB, and the PyPI repository is 10TB in their entirety! Due to this, active mirrors can take a long time to complete.
Passive mirroring
Passive mirroring creates a metadata file that is a complete list of packages on the mirrored server. When a user needs a package, they can run conda install
<PKG_NAME>and the requested package will be downloaded from the source at that time.
Note
Regardless of which mirror you choose to create, the packages will be the same. Anaconda recommends establishing your mirrors as passive.
- External Source URL
This is the URL of the server/repository you want to mirror.
- Anaconda recommends creating mirrors for the following external source channels:
Note
If your external source channel is another channel within Package Security Manager, you must use the format
https://<URL>/api/repo/<CHANNEL_NAME>.If your external source channel is a channel from Anaconda Business, you must use the format
https://repo.anaconda.cloud/repo/t/<TOKEN>/<ORG_ID>/<CHANNEL_NAME>.
- Mirror Type
Set the type of packages that will be mirrored from the external source channel. This should align with the selection on the Create Channel form. Packages in this mirror that do not match the channel package type will be filtered out.
You can choose from conda, standard python, or standard R package types. Make sure you have allowlisted the URLs listed at the top of this page before creating mirrors.
- Platforms
The same packages exist within the repository for multiple platforms. You can restrict the packages in your mirror to those that work with the platforms selected here. Many platform-specific packages will require a
noarch(no architecture) dependency to run. Package Security Manager will automatically include these dependencies for you when you create your mirror.- The most common platform selections are:
win-64
linux-64
osx-64
osx-arm64
Note
Standard python and standard R mirror forms are slightly different from conda mirrors, and do not include this field.
- Mirroring Frequency
Set the frequency you want your mirror to run and update your packages. The default value instructs the mirror to update at midnight on the first day of every month.
Custom frequencies use cron expressions to determine when they run.
Caution
Mirroring large channels can take several hours. Anaconda recommends against setting a frequency greater than Daily to avoid collisions between currently running and updating mirrors.
Warning
If you are mirroring the full PyPI repository, set your frequency to run once yearly. Once the PyPI mirror is complete, any attempts to re-run the mirror will cause issues.
- Run Now
Check this box to start your mirror when you click Save & Run. If the Run Now box was not checked, your changes will be saved, and the mirror will run the next time its frequency configuration instructs it to do so.
- Legacy Packages
Check the Keep Legacy Packages box to mirror both
.condaand.tar.bz2package files. These are different file types of the same packages, and will effectively double your necessary storage space (only available forcondapackage types).
- CVE Filters
Choose to restrict packages by common vulnerability and exposure (CVE) score and/or status. You can also choose to allowlist specific CVEs by their ID.
Note
CVE filters are only available for conda type mirrors.
- Package Filters
If you know the specific packages you want your mirror to contain by name, you can select the Only include the following package names checkbox and list the packages you want your mirror to contain individually. Enter the name of the package you want to include in your mirror and press the tab key, then enter the next package name, and so on. Click the info icon to see examples of how to utilize MatchSpec protocol to specify packages.
Tip
If the list of packages you want to provide your users is both very specific and very large, consider creating your mirror via the CLI to save time and effort! For information on mirroring via the CLI, see Package Security Manager (On-prem) CLI.
Caution
Populating your channel with packages in this manner will not automatically populate the channel with their dependencies. If you do not have all the necessary packages, you will not be able to successfully create an environment from the channel with conda.
- Include dependencies
Select this checkbox if you are using the Only include the following package names filter, but do not know what your dependencies are. Package Security Manager will automatically include the dependencies your listed packages need to operate correctly in this channel. You can download a report for your mirrors dependencies once the mirror completes. For more information, see Download Dependency Report.
- Exclude Packages
If you know of specific packages you want to exclude from your mirror, you can filter them out here. Enter the name of the package you want to exclude from your mirror and press the tab key, then enter the next package name, and so on.
You can also exclude packages based on their license type. Open the dropdown selection and choose a license to exclude from your mirror. If you need to exclude multiple license types, open the dropdown menu again and select another license type to add to the filter. For more information on licenses, see License types.
Packages can be excluded against non-exact values by including wildcard * and >/< ranges–where supported. For example, if you choose to exclude the package
p*, Package Security Manager will exclude all packages that start with the letter “p”. For more information about using non-exact value search queries, see Package match specifications.
- Include Packages
The include packages filter works in tandem with the exclude packages filter. You can choose to include specific packages that would otherwise be removed by the exclude packages filter by listing them here.
Following from the example above, to include
pythonin your mirror, you must add it here to explicitly include that package, because all packages starting with the letter “p” were excluded by the exclude filter.
- Date Range
Instruct the mirror to only include packages that were built within the range selected.
- Only Signed Packages
Select this checkbox to only mirror packages with Anaconda signatures from the source mirror. The source mirror must be an Anaconda Business channel.
- View Channel Filters
View the filters that are applied to your channel. Avoid setting filters in your mirror that will be counteracted by your channels filters.
- Cancel/Save & Run
Select Cancel at any time to quit your mirror form completion and discard any set parameters. Select Save & Run to start your mirror.
Editing mirrors#
The Edit mirror form contains the information used in the Create mirror form.
Navigate to a channel’s details page.
Select the Mirrors tab.
Click the mirror’s actions icon, then click Edit to view the Edit mirror form.
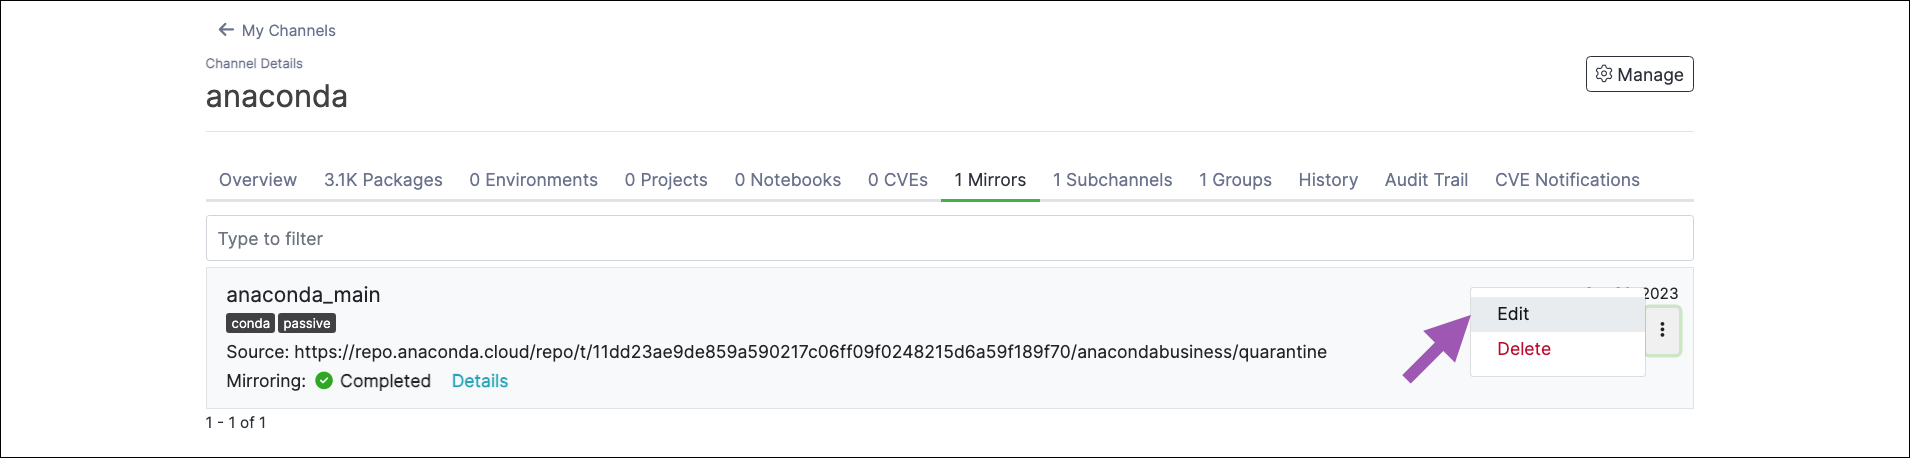
Make your changes, then click Save. If the Run Now box is not checked, your mirror will run the next time its frequency configuration instructs it to do so.
Note
You cannot edit the mode of an established mirror.
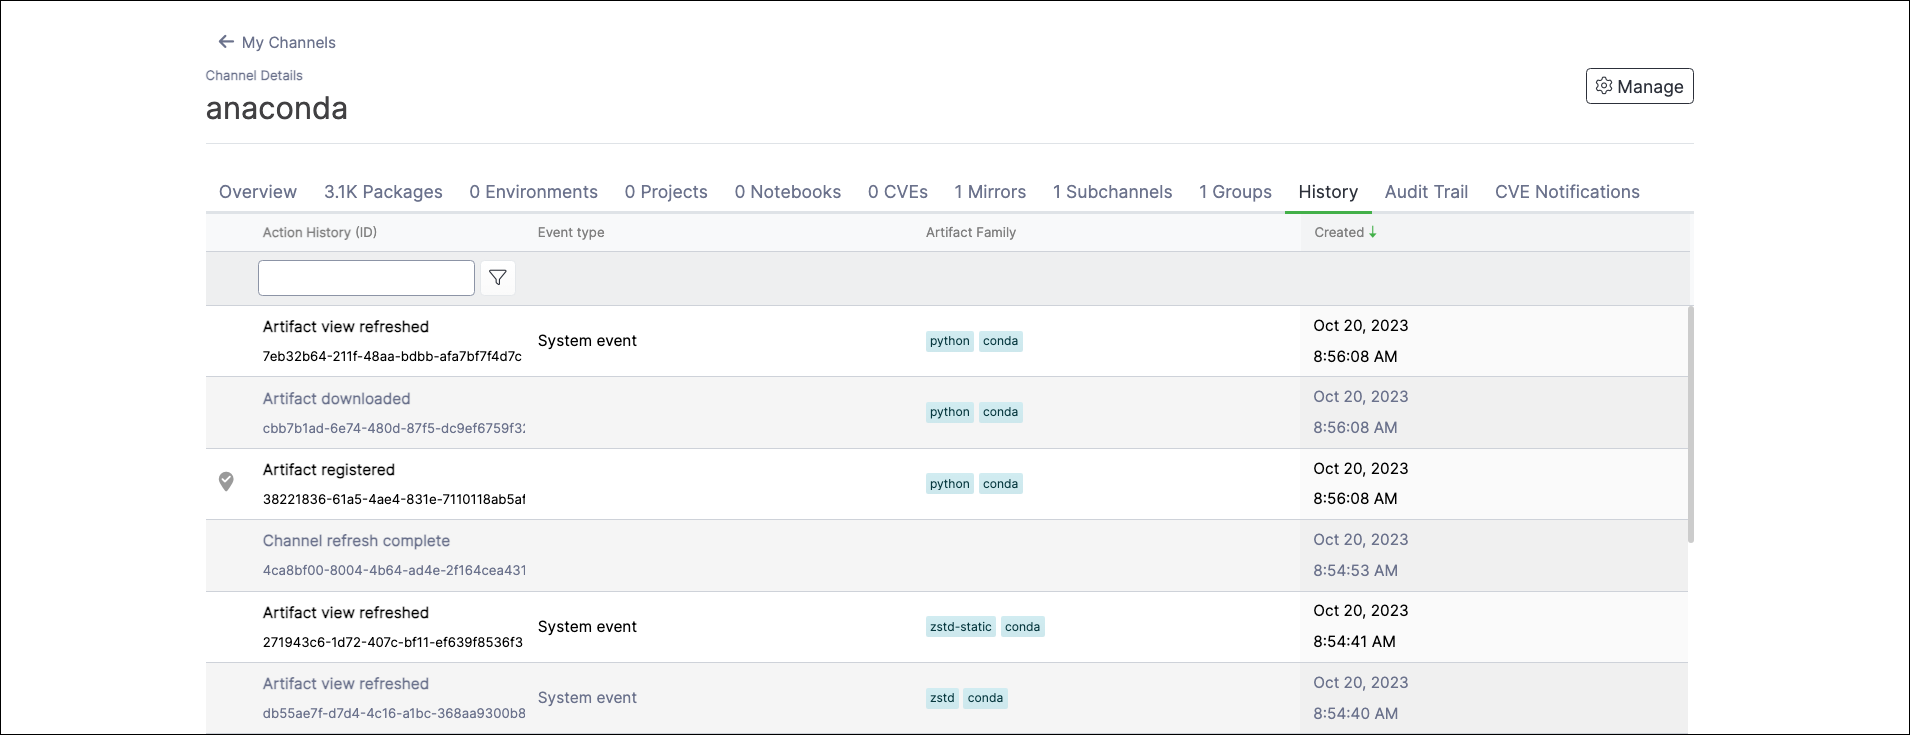
Viewing mirror history#
Mirroring events/actions can be viewed from the channel’s History tab. Events are listed in chronological order by default and include the event ID, type, artifact family (if applicable), and the date/time the event occurred. Select any historical event to view its metadata.
Historical events for mirrors are as follows:
Mirror created
Mirror started
Mirror completed
Mirror failed
Mirror stopped
Mirror restarted
Mirror deleted
Artifact registered
Artifact generated
Artifact removed
Artifact metadata updated
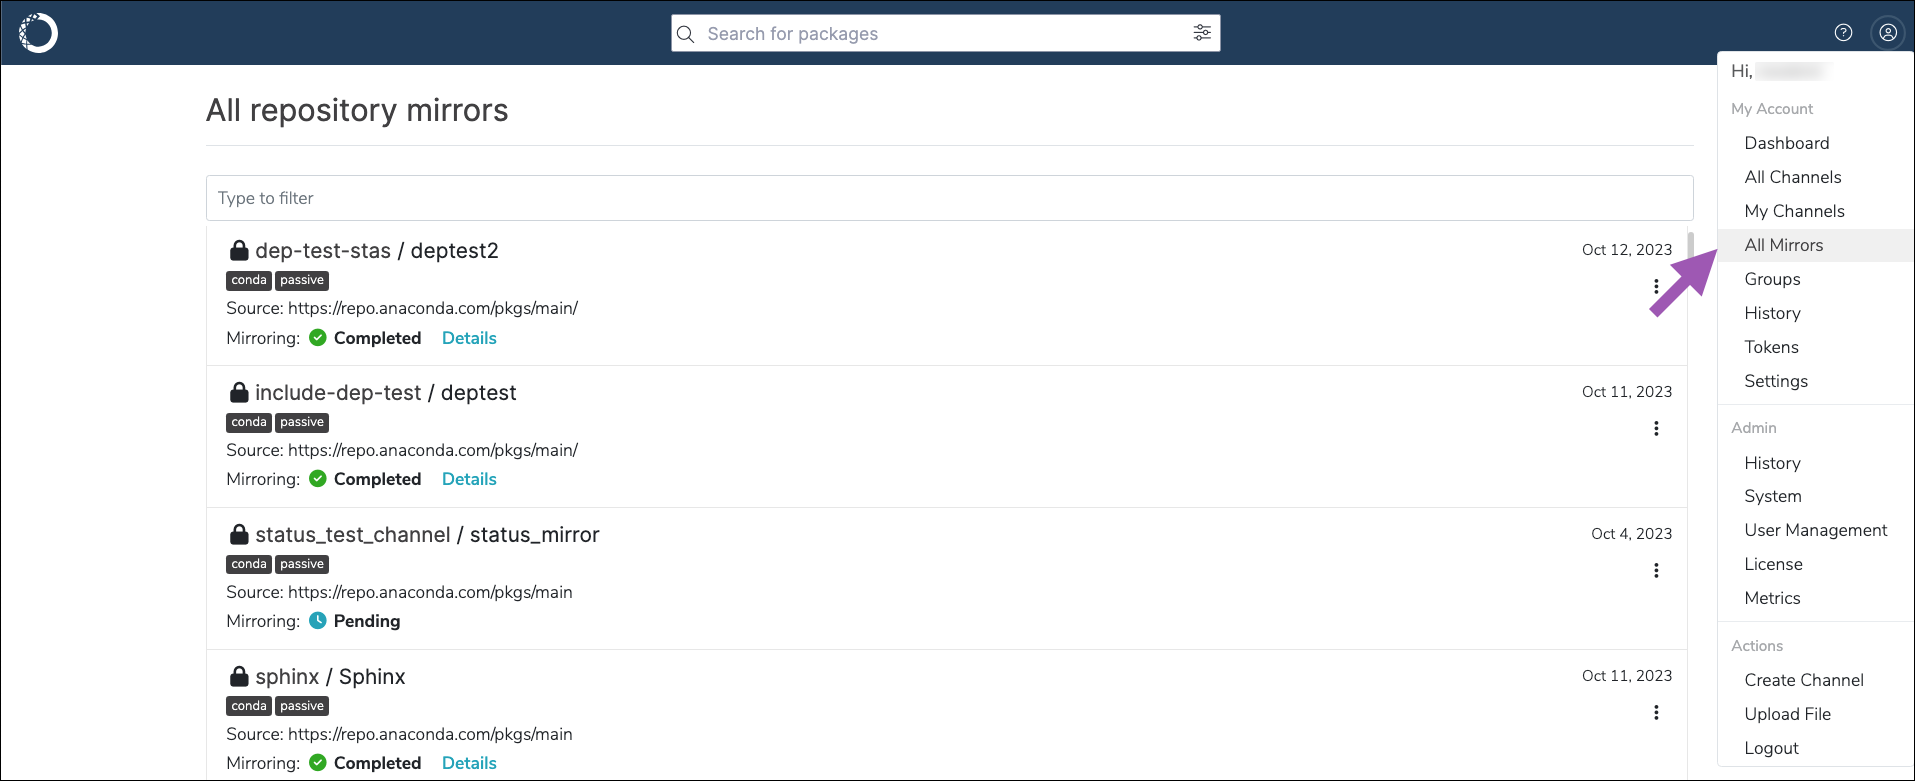
Viewing all repository mirrors#
View mirror progress and results globally for all users from the All Repository Mirrors page.
Note
This page is available only to users whose role in Keycloak has the mirror attribute set to manage.
From this view, you can sort mirrors by name, type, mode, status, or last update time by clicking the corresponding column header in the table.
Viewing mirror status#
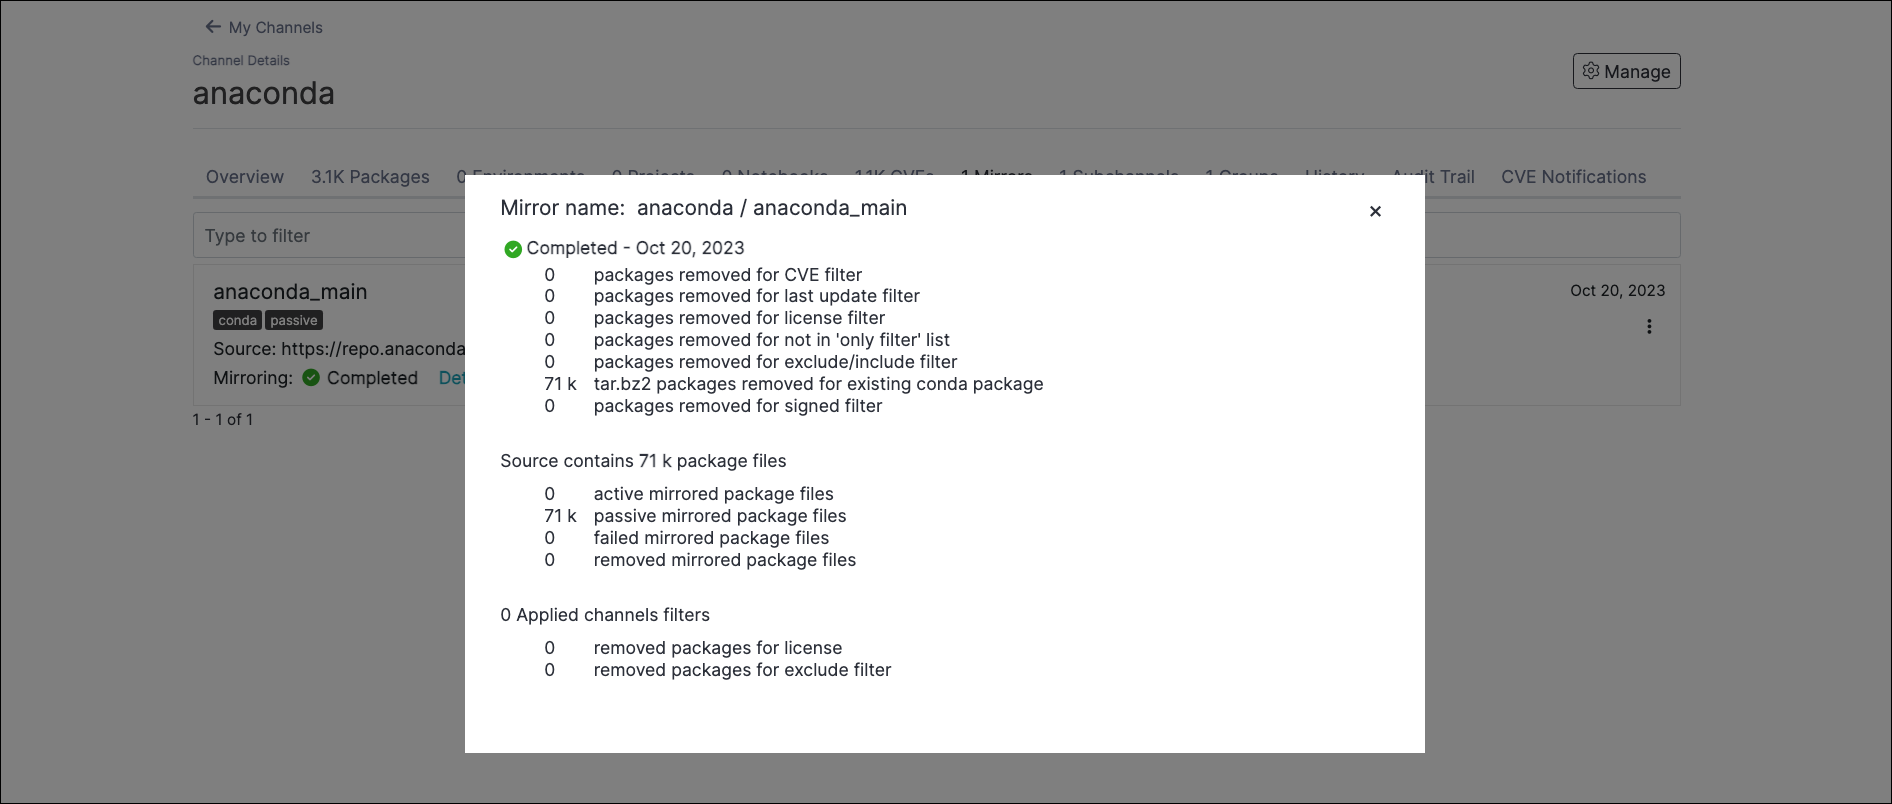
Mirror status can be viewed from either the channel’s Mirrors tab or the All Repository Mirrors page. In progress mirrors display which step is currently being performed with a brief description of the operation.
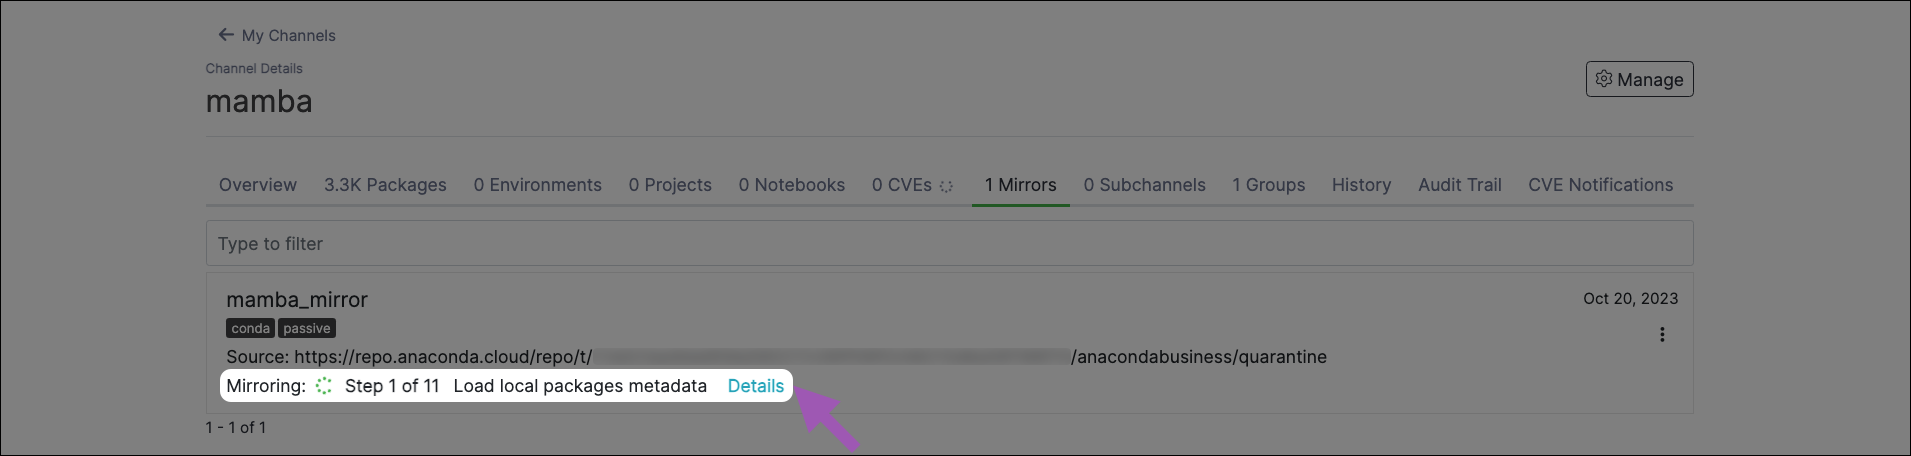
Click Details to get statistics about packages in your mirror. The Mirroring Details modal shows you information like when the mirror completed or failed, how many packages were filtered out of your mirror from its source, and for what reason (applied mirror/channel filters). It also shows how many packages were mirrored, how they were mirrored, how many failed to mirror properly, and how many have been removed from the mirror.
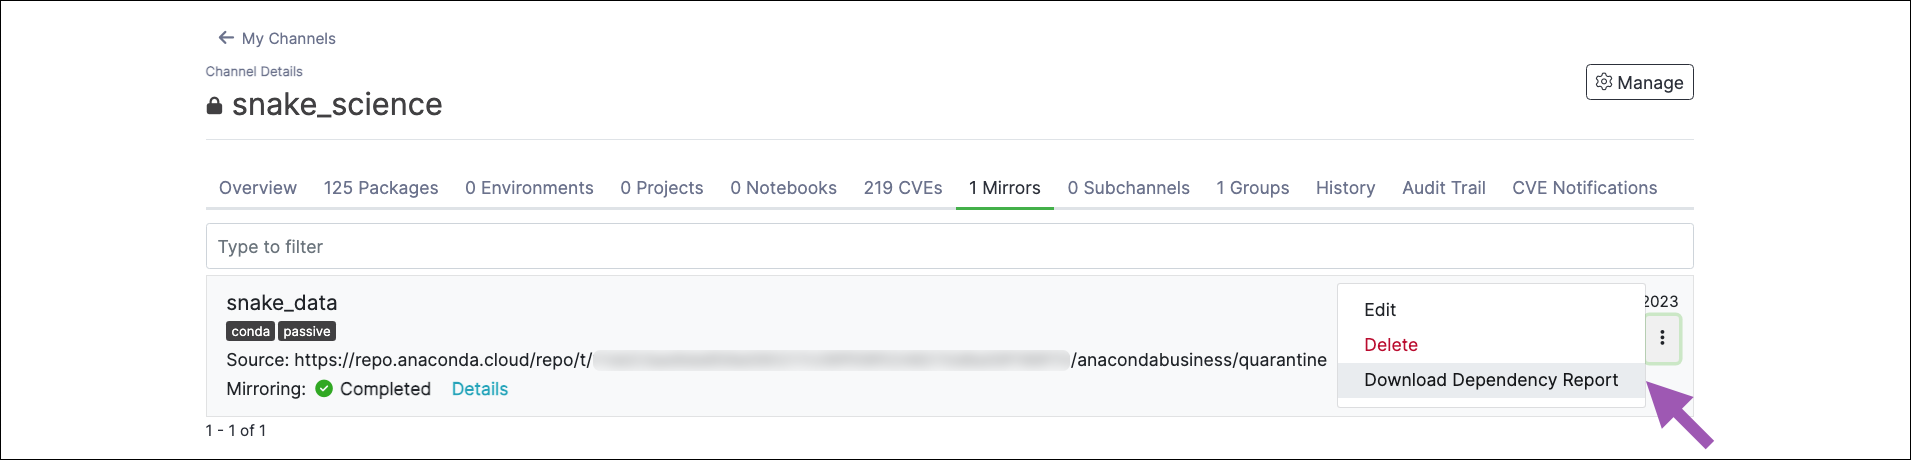
Downloading a dependency report#
If you select both the Only include the following package names: and Include dependencies checkboxes when you run your mirror, you will be able to download a .json formatted report that shows a list of package dependencies for the mirror.
To download a dependency report:
Navigate to your channel and select the Mirrors tab.
Click the mirror’s actions icon, then select Download Dependency Report.
Stopping and restarting a mirror#
You can stop a running mirror from its channel’s Mirrors tab or the All Repository Mirrors page.
Click the mirror’s actions icon, select Stop, and then confirm you want to stop your mirror.
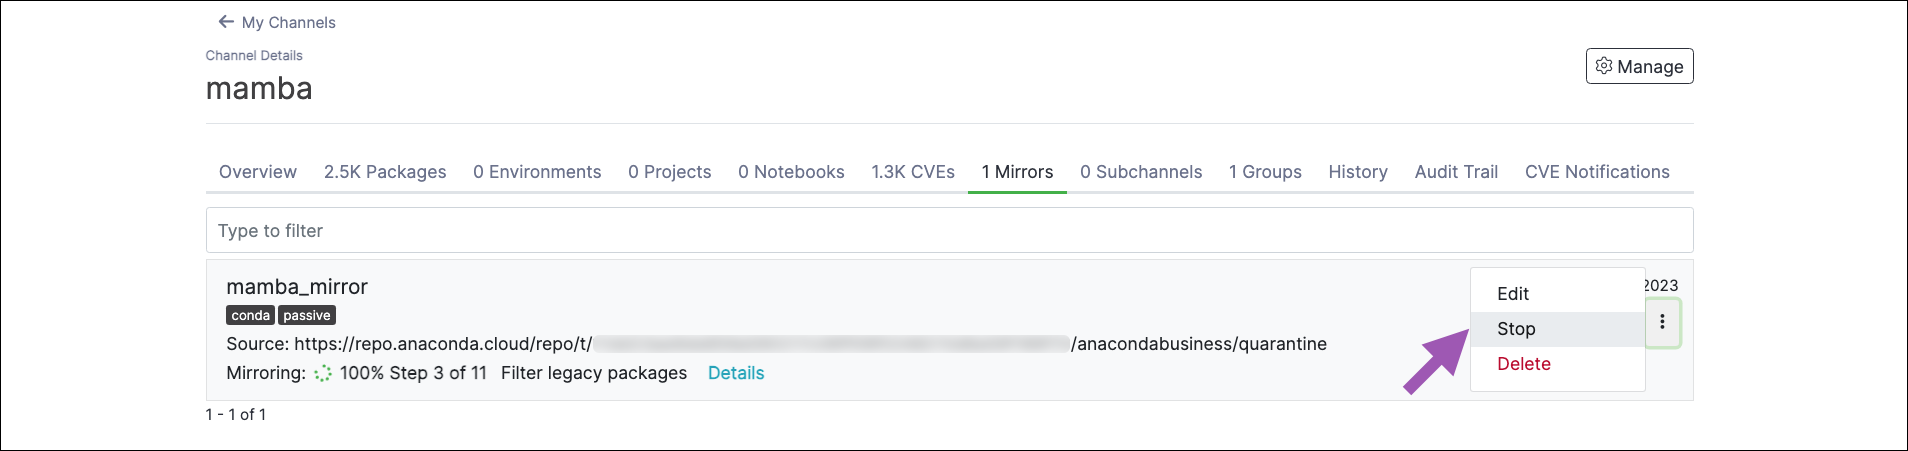
Note
It can take up to 10 minutes for a mirror to fully stop. A mirror in the process of stopping will display Stopping as its mirroring status. Once it is complete, it will display Stopped as its status. Stopping a mirror does not discard the progress the mirror has made, and some packages may appear in your channel’s Packages tab.
You can restart a stopped mirror from its channel’s Mirrors tab or from the All Repository Mirrors page.
Click the mirror’s actions icon, select Restart, and then confirm you want to restart your mirror.
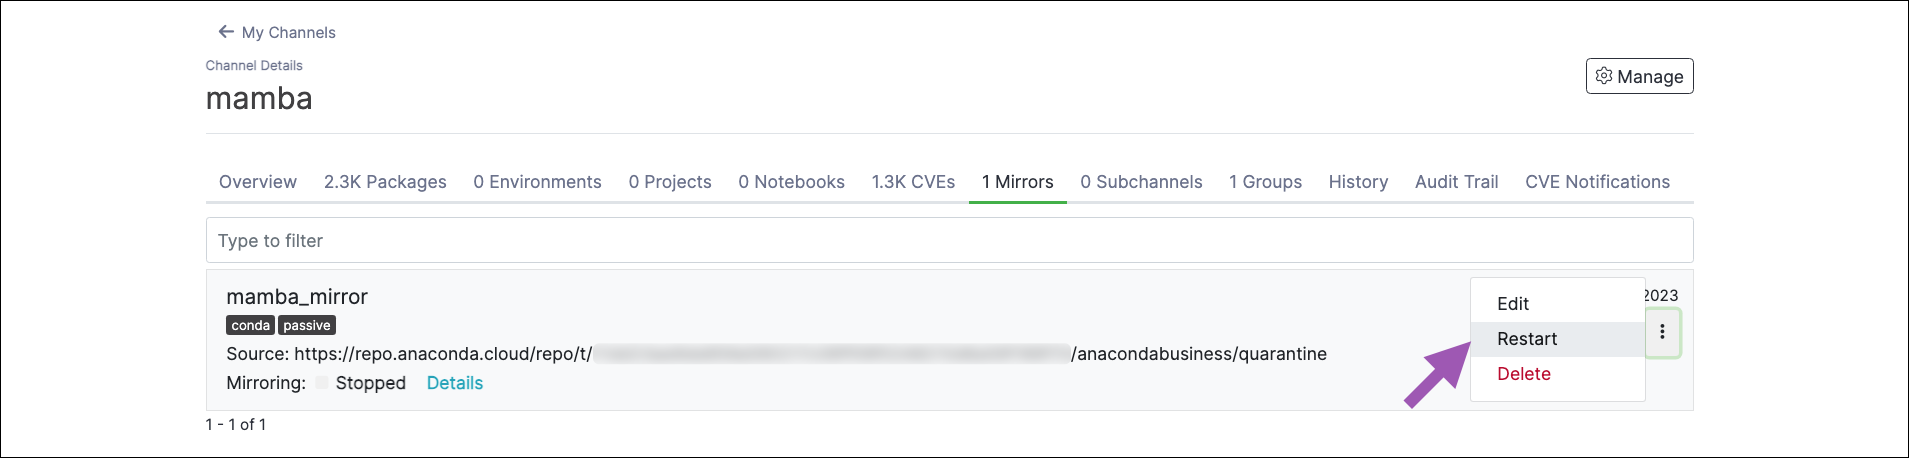
Note
The restart option is only available for mirrors that have been stopped. Mirrors that have failed or completed must be run from the Edit mirror page. Restarted mirrors run from the beginning of the mirroring process, not from where you stopped the run.
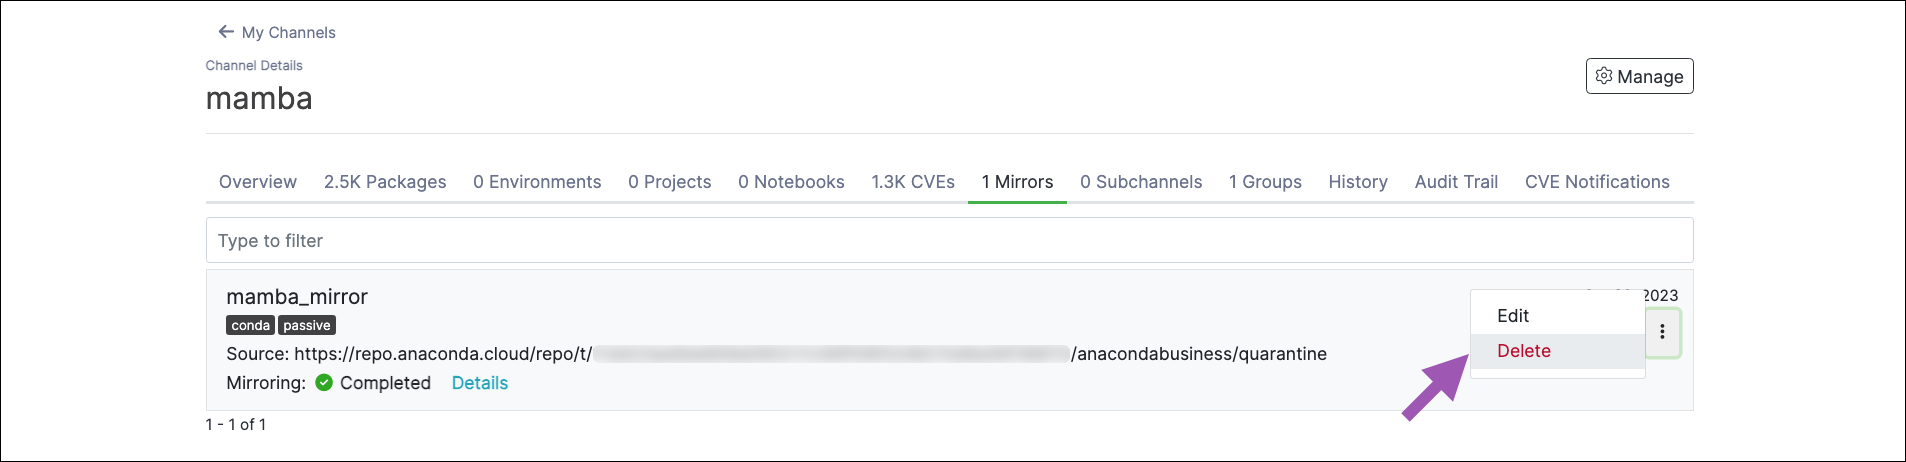
Deleting a mirror#
You can delete a mirror from its channel’s Mirrors tab or the All Repository Mirrors page.
Click the mirror’s actions icon, select Delete, and then confirm you want to delete your mirror.