User management#
Package Security Manager (On-prem) utilizes Keycloak to manage user identity and access permissions. Keycloak is open source and provides integration with various identity providers, including LDAP and Active Directory.
Accessing the Keycloak administrative console#
You can access your Keycloak administrative console in one of two ways:
Method one:
Navigate directly to the administrative console at https://<FQDN>/auth/admin in your browser, where <FQDN> is your Package Security Manager fully qualified domain name, then log in using your Package Security Manager admin credentials.
Method two: To access the administrative console in Package Security Manager UI, complete the following steps:
Log in to Package Security Manager.
Open the user dropdown menu and select User Management.
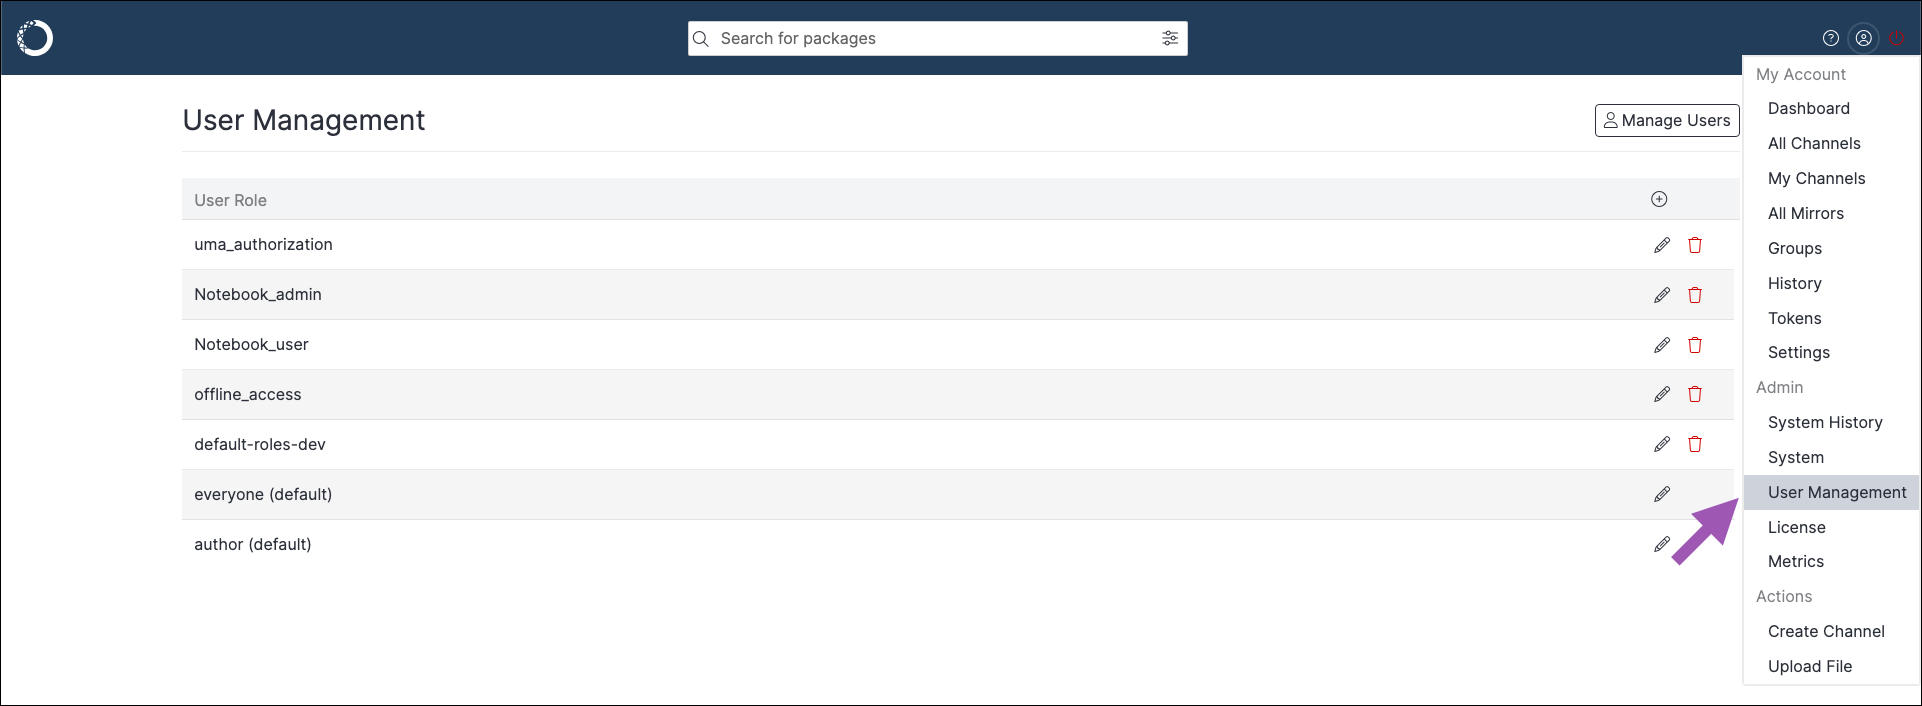
Click Manage Users to be redirected to the Keycloak login screen.
Log in using admin credentials.
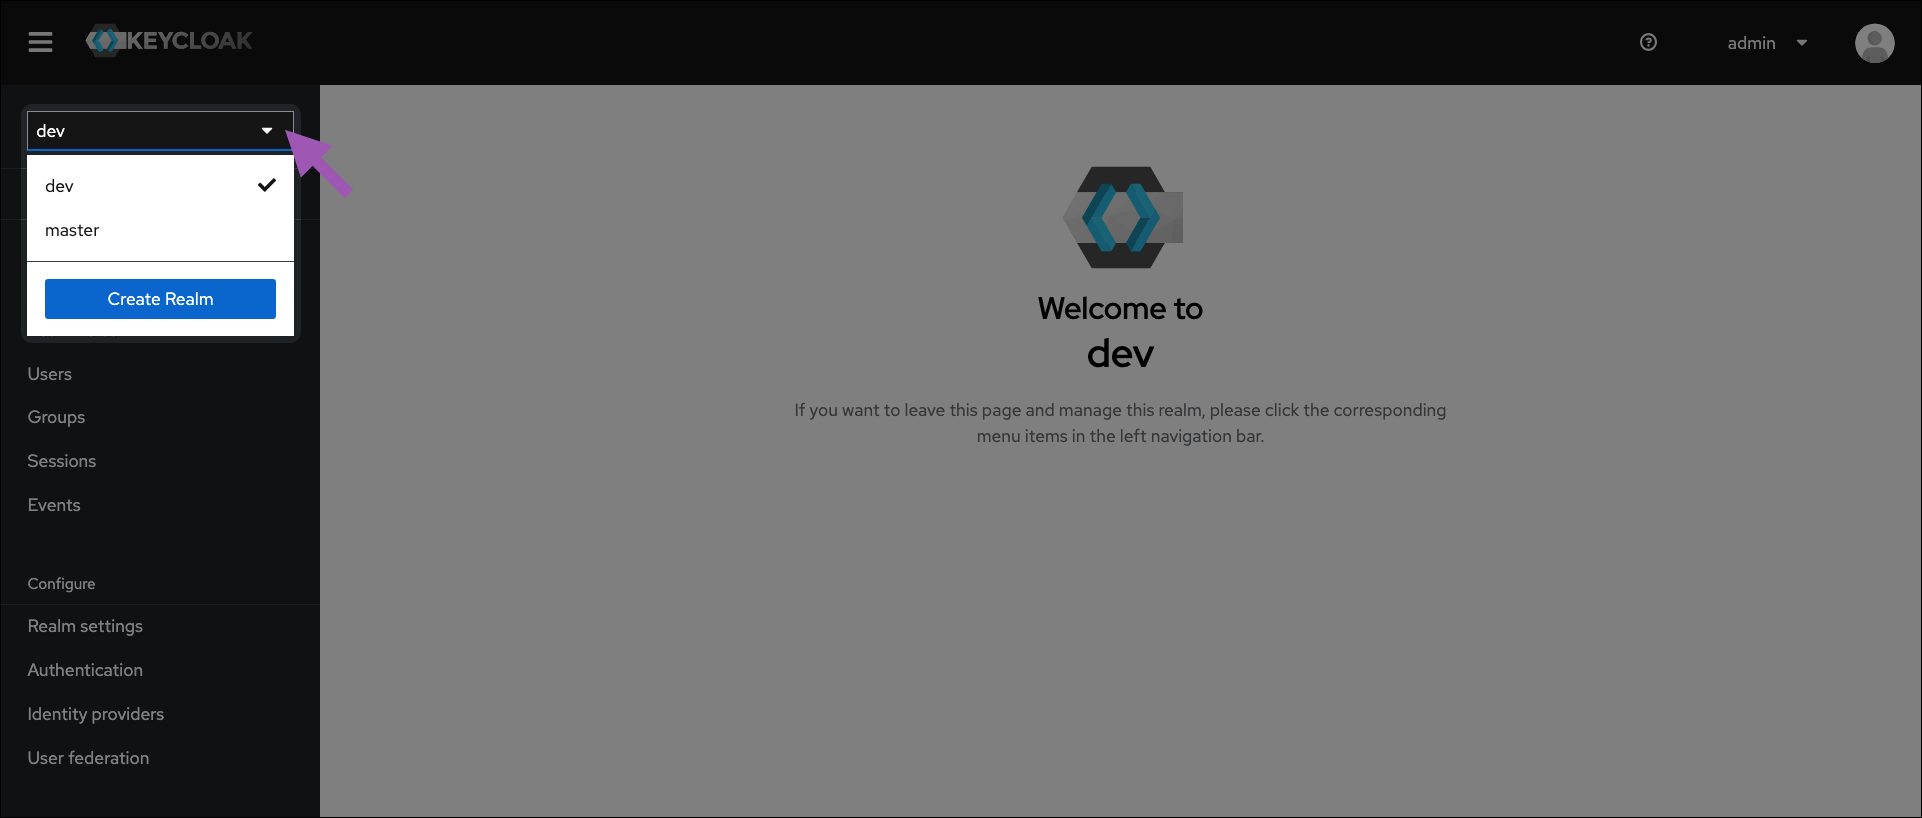
Realms#
In Keycloak, a realm is an isolated space containing all the necessary information to manage the authentication and authorization of users on a specific domain. Each realm has its own set of users, permissions, and client applications.
The master realm contains the admin user profiles. Admin users are able to log in to Keycloak and manage configurations for other users.
The dev realm contains all other user profiles. These users can log in to Package Security Manager and download packages from the channels you create.
Further permissions for users on a realm are provided using roles. For more information, see Roles and permissions.
Realm selection#
Select your realm from the dropdown menu in the upper-left corner.
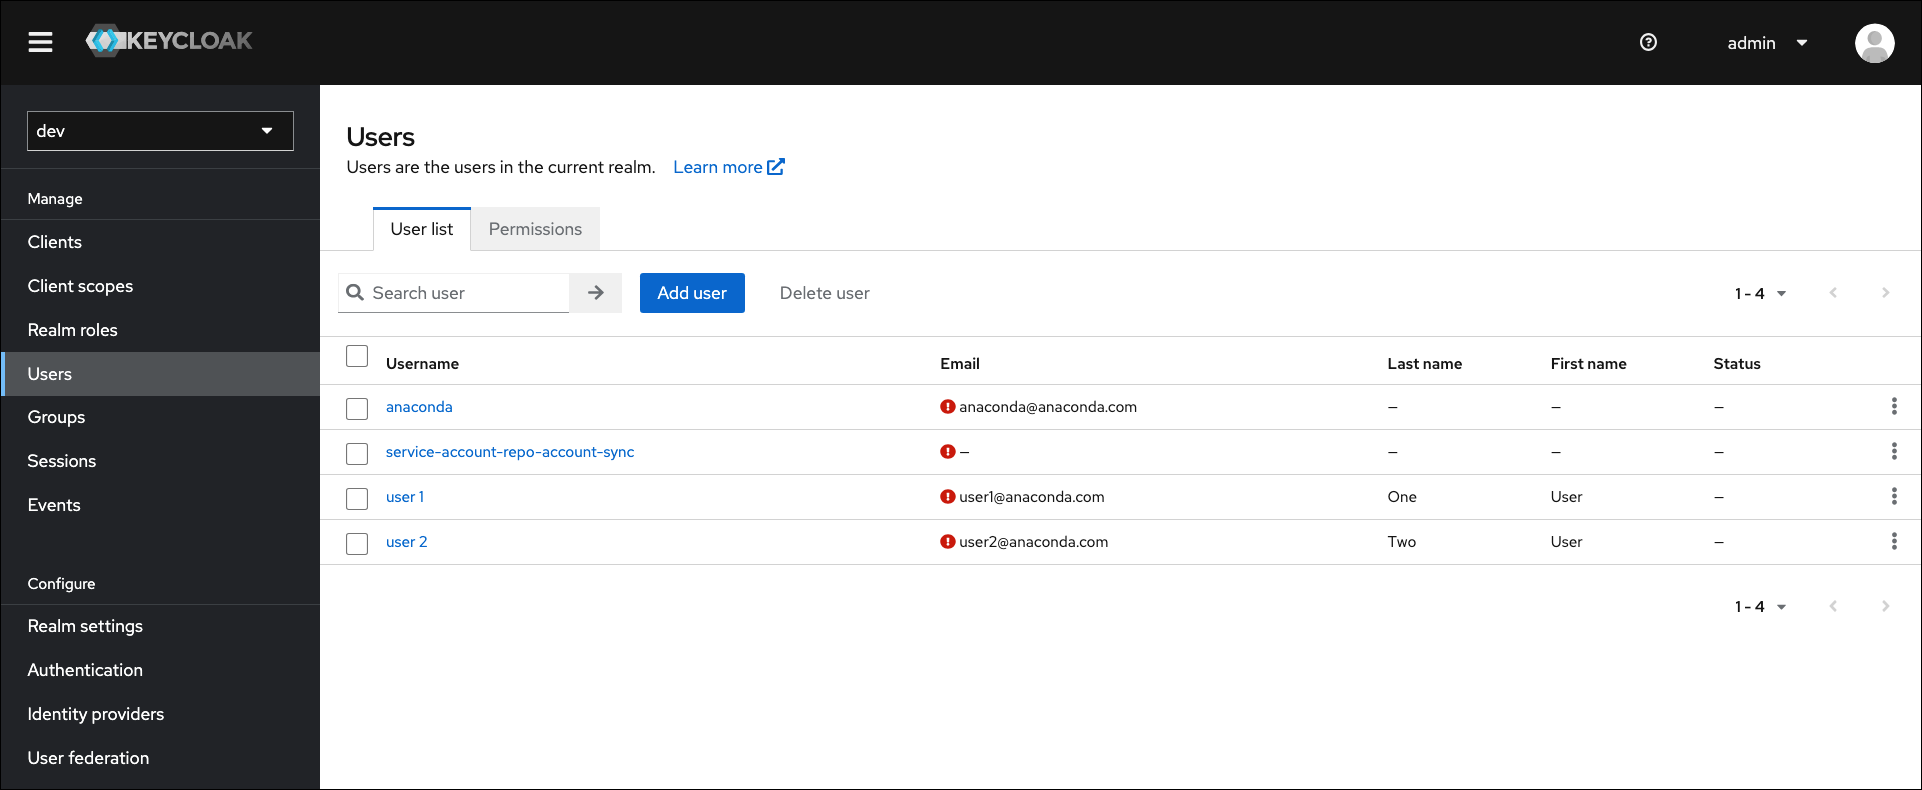
Viewing local users in Keycloak#
To view your users at any time, complete the following steps:
Access the Keycloak administrative console.
Verify you are in the dev realm.
Navigate to Users in the left-hand navigation.
Note
This list of users will not automatically contain users imported from external databases, such as a directory server (LDAP/AD).
Viewing federated users in Keycloak#
To include users from an external directory server database in the local users list, complete the following steps:
Access the Keycloak administrative console.
Verify you are in the dev realm.
Navigate to User Federation in the left-hand navigation.
Select your directory server.
Expand the Sync Settings options.
Toggle Periodic Changed Users Sync to
ON.
Note
The sync period is measured in seconds, and the default setting of 86,400 seconds is equal to 24 hours, or once daily. The servers must synchronize before imported users appear in the local database.
Creating a new user#
If you want to provide access to Package Security Manager for a new member of your organization, you need to add their identity information into Keycloak.
To create a user, complete the following steps:
Access the Keycloak administrative console.
Verify you are in the dev realm.
Navigate to the Users in left-hand navigation.
Select Add user.
Enter the user’s information and toggle Email Verified to
ON.Optionally, if you want to add the user to an existing group, click Join Groups, select available groups from the list, and then click Join.
Note
Adding a new user to a group provides the user with all permissions associated with the group. For more information, see Group roles.
Click Save. More tabs appear.
Select the Credentials tab.
Click Set password.
Enter a password for your user.
If you want the user to choose their own password, leave Temporary toggled
ON. If you want to control their password, toggle Temporary toOFF.Click Save.
Creating a new admin user#
To add an admin user to the master realm with full permissions, complete the following steps:
Access the Keycloak administrative console.
Verify you are in the master realm.
Navigate to Users in the left-hand navigation.
Select Add user.
Enter the admin user’s information and toggle Email Verified to
ON.Optionally, if you want to add the admin user to an existing group, click**Join Groups**, select available groups from the list, and then click Join.
Note
Adding a new admin to a group provides the admin with any permissions associated with the group. For more information, see Group roles.
Click Save. More tabs appear.
Select the Credentials tab.
Click Set password.
Enter a password for your admin user.
If you want them to choose their own password, leave Temporary toggled
ON. If you want to control their password, toggle Temporary toOFF.Click Save.
Select the Role Mappings tab.
Click Assign role.
Select admin from the list.
Click Assign.
Creating an admin user at the command line#
To add an admin user to the master realm with full permissions from the command line, complete the following steps:
Open a terminal and connect to your Package Security Manager instance.
Exec into the Keycloak Docker container by running the following command:
# Replace <INSTALLER_DIRECTORY> with your keycloak container ID
docker exec -it <INSTALLER_DIRECTORY>_keycloak_1 /bin/bash
Log in to your Keycloak admin console by running the following command:
# Replace <USERNAME> with your admin account username
/opt/keycloak/bin/kcadm.sh config credentials --server http://localhost:8080/auth --realm master --user <USERNAME>
Enter your admin account password when prompted.
Create your new admin user by running the following command:
# Replace <USERNAME> with the new admins username
/opt/keycloak/bin/kcadm.sh create users --server "http://localhost:8080/auth" -r master -s username=<USERNAME> -s enabled=true
Set a password for the new admin user by running the following command:
# Replace <USERNAME> with the new admins username
# Replace <PASSWORD> with a password for the new admin user
/opt/keycloak/bin/kcadm.sh set-password -r master --username <USERNAME> --new-password <PASSWORD>
Assign role permissions to the new admin user by running the following command:
# Replace <USERNAME> with the new admins username
/opt/keycloak/bin/kcadm.sh add-roles --uusername <USERNAME> --rolename admin -r master
Log in to Keycloak using the newly created admin credentials from the following URL:
# Replace <FQDN> with your Package Security Manager fully qualified domain name
<https://<FQDN>/auth/admin/master/console>
Restricting admin rights#
Creating an admin user with restricted rights allows you to delegate the responsibility for managing users, channels, and groups on the dev realm to another admin user, without giving them access to manage the master realm. You can create admin roles with restricted rights through the use of composite roles. For more information on composite roles and to view an example of how to provide restricted admin permissions, see Composite roles.
Changing your admin account password#
When you update the password for the Keycloak admin account that was created during installation of Package Security Manager, you must also make sure to update the KEYCLOAK_ADMIN_PASSWORD parameter in your .env file.
To update your admin account password:
Access the Keycloak administrative console.
Verify you are in the master realm.
Navigate to Users in the left-hand navigation.
Select admin from the list of available users.
Select the Credentials tab.
Click Reset password.
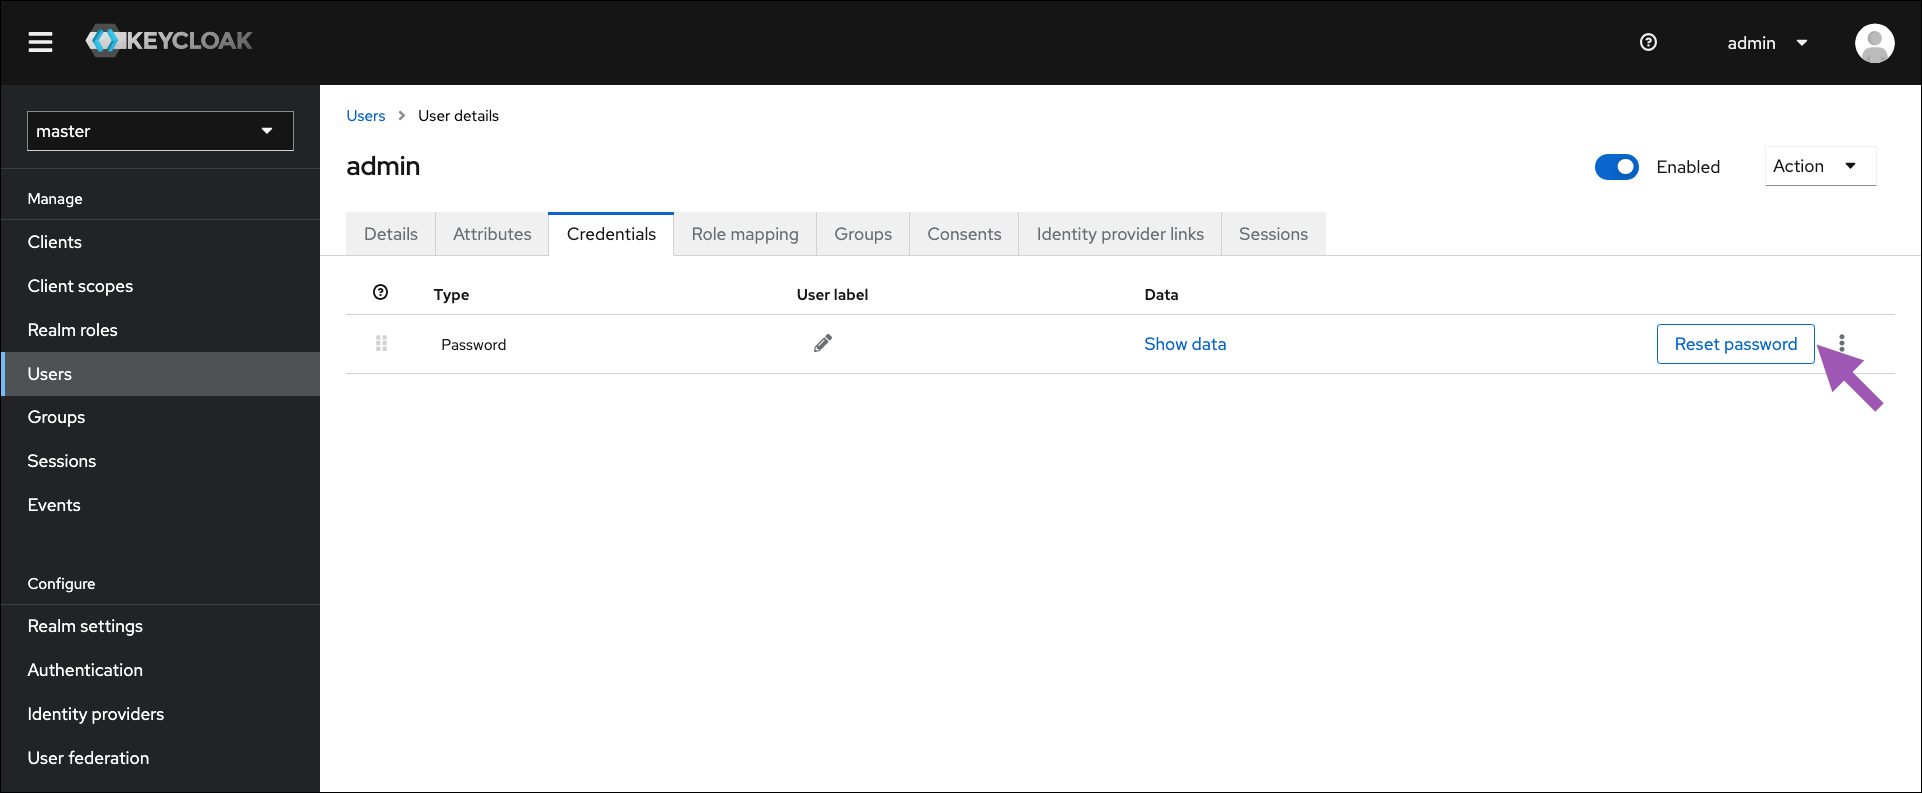
Enter and confirm a new password for your admin account.
Toggle Temporary to
OFF.Click Save.
Open a terminal and connect to your instance of Package Security Manager. Contact your IT department if you need help with this step.
Enter your installer directory by running the following command:
# Replace <INSTALLER_DIRECTORY> with your instance's installer folder
cd <INSTALLER_DIRECTORY>
Open the
.envfile in your preferred file editor.Locate the
KEYCLOAK_ADMIN_PASSWORDparameter and update the entry to match your new admin account password.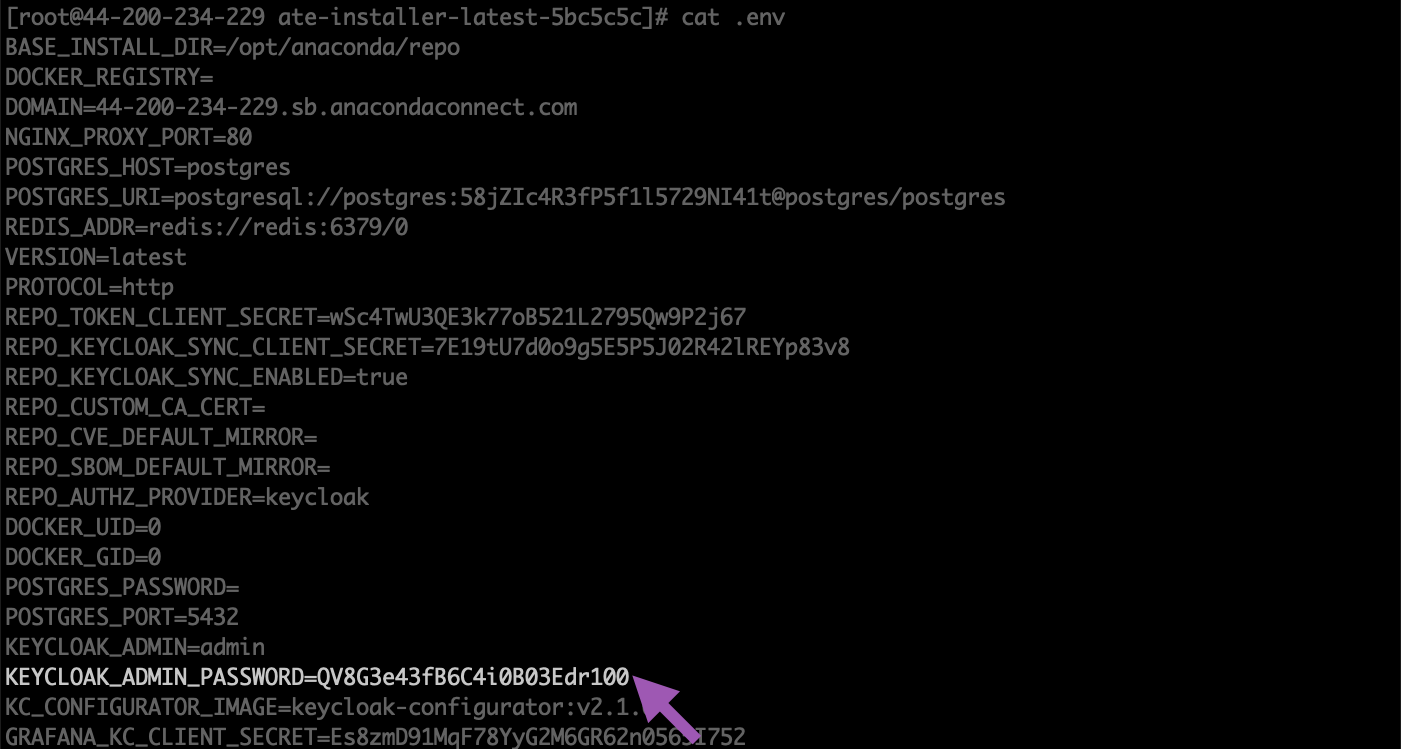
Save your changes and close the file.
Changing your admin account email#
To update the email address that is associated with the Keycloak admin user:
Access the Keycloak administrative console.
Verify you are on the master realm.
Select Users from the left-hand navigation.
Select admin from the list of users.
Enter the email address, first name, and last name of the admin user in the Details tab.
Click Save.
