Integrating with Anaconda Server
Now that you have JupyterHub installed, you’ll need to integrate it with your instance of Anaconda Server so the two can communicate with each other for authentication. To accomplish this, you’ll need to create a client for the JupyterHub instance in your Anaconda Server’s Keycloak and edit your jupyterhub_config.py file.
Prerequisites
- A working instance of Anaconda Server using TLS/SSL
- A working instance of JupyterHub using TLS/SSL
Integration
Before you begin the integration process, gather the following information:
- Your Keycloak administrator username and password.
- Your Anaconda Server fully qualified domain name (FQDN)
- Your JupyterHub FQDN.
- Locations of your JupyterHub TLS/SSL certificate and key.
In /opt/jupyterhub/keycloak, there is a file called keycloak.py. This is a Python file that contains two functions that you can run as commands, create and list.
The create command creates a client mapper in Keycloak and returns the client’s secret to the command line to be used by the jupyterhub_config.py file to manage your instance of JupyterHub.
The list command displays all of the clients mapped to your instance of JupyterHub, the client’s secret, root URL, authenticator type, and all redirect URIs established within Keycloak.
Source your new environment by running the command:
source /root/.bashrcNavigate to your
/opt/jupyterhub/keycloakdirectory.cd /opt/jupyterhub/keycloakCreate your client mapper using the
createcommand. Copy the secret that is returned from running the command and save it in a secure location.# Replace <KEYCLOAK_USER_NAME> with your Keycloak admin user ID # Replace <KEYCLOAK_PASSWORD> with your Keycloak admin password # Replace <ANACONDA_SERVER_FQDN> with your Anaconda Server fully qualified domain name # Replace <CLIENT_ID> with the name you're giving your JupyterHub client; Anaconda recommends "jupyterhub" for simplicity # Replace <JHUB_FQDN> with your JupyterHub instance fully qualified domain name python keycloak.py create -u <KEYCLOAK_USER_NAME> -p <KEYCLOAK_PASSWORD> --protocol https --domain <ANACONDA_SERVER_FQDN> --clientid <CLIENT_ID> --baseurl https://<JHUB_FQDN>
If you do not save it, you can find the information again by running the
listcommand.# Replace <KEYCLOAK_USER_NAME> with your Keycloak admin user ID # Replace <KEYCLOAK_PASSWORD> with your Keycloak admin password # Replace <ANACONDA_SERVER_FQDN> with your Anaconda Server fully qualified domain name python keycloak.py list -u <KEYCLOAK_USER_NAME> -p <KEYCLOAK_PASSWORD> --protocol https --domain <ANACONDA_SERVER_FQDN>
Find and open your
jupyterhub_config.pyfile. The default path is/opt/jupyterhub/etc/jupyterhub/jupyterhub_config.py.Scroll down to the end of the file. There is a section that shows you where to modify the file so you can integrate with Anaconda Server.
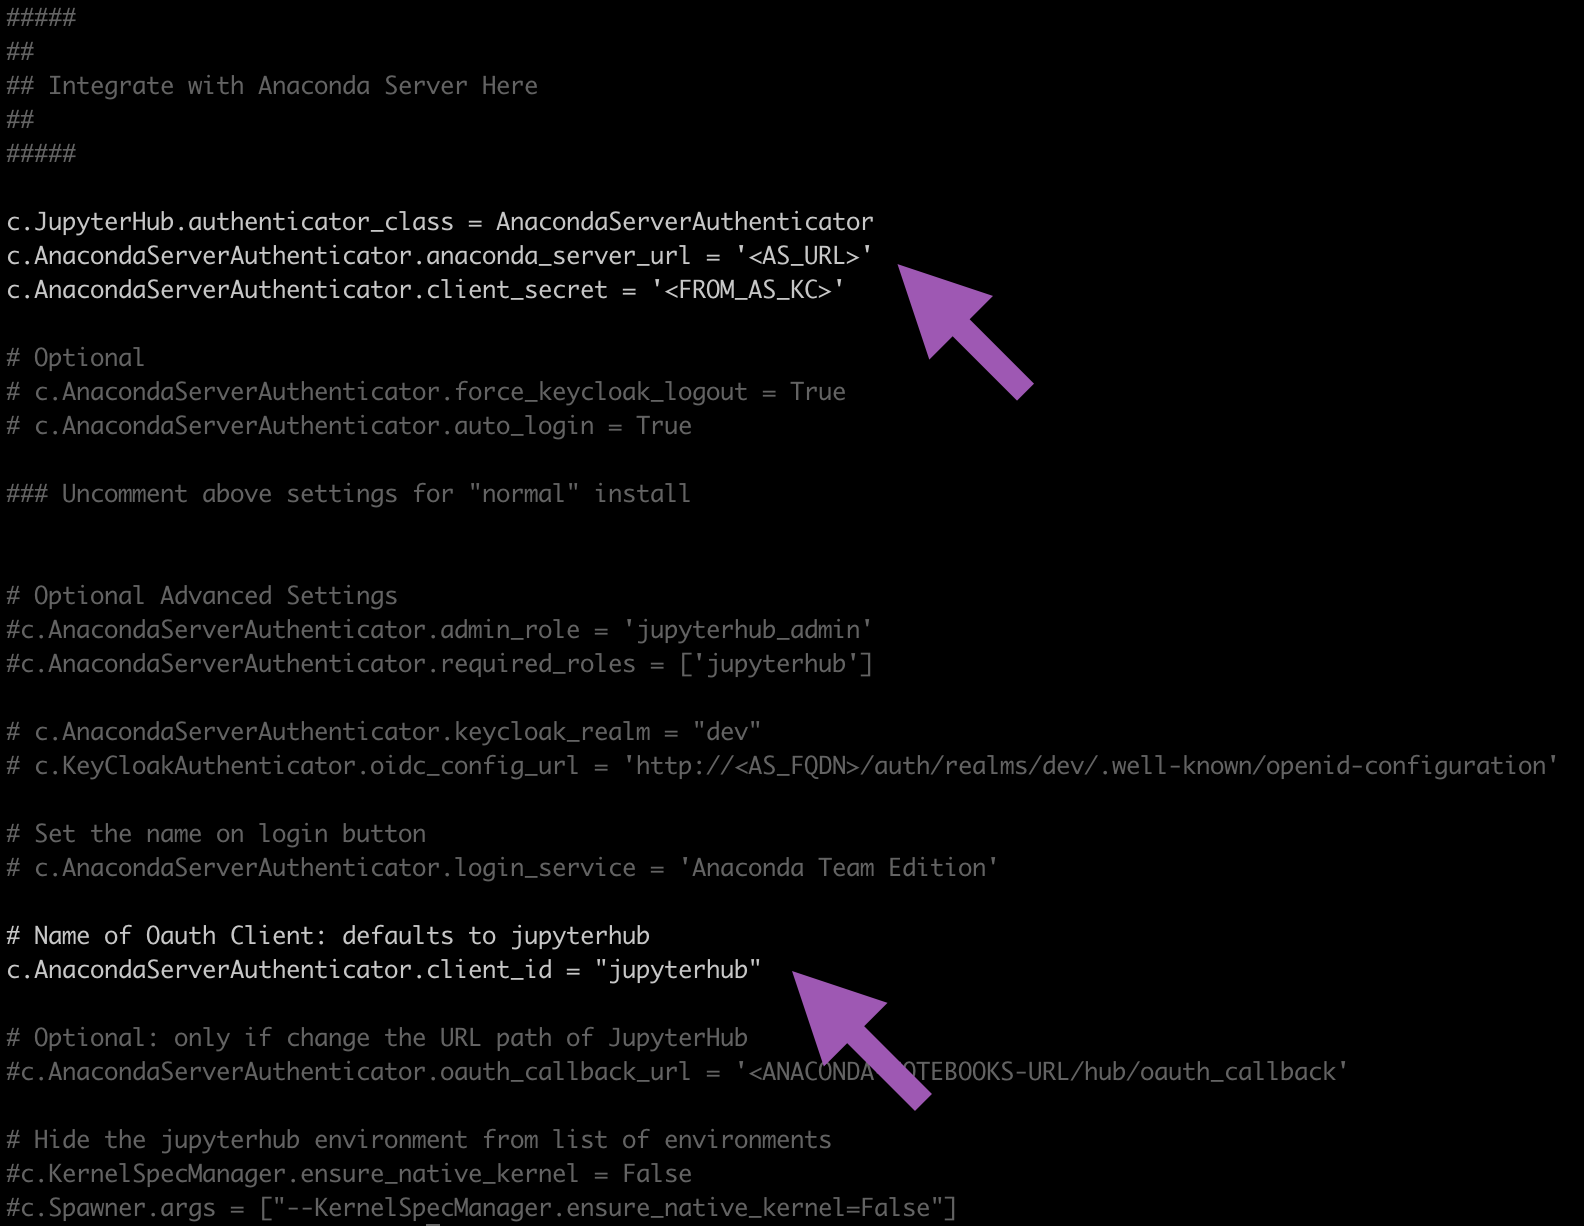
####
##
## Integrate with Anaconda Server Here
##
####
Find and comment in the following lines to this section of the file by removing the
#and update them as follows:# Replace <AS_URL> with your Anaconda Server fully qualified domain name # Replace <FROM_AS_KC> with the secret from your keycloak.py create command output c.JupyterHub.authenticator_class = AnacondaServerAuthenticator c.AnacondaServerAuthenticator.anaconda_server_url = '<AS_URL>' c.AnacondaServerAuthenticator.client_secret = '<FROM_AS_KC>' # Find this line further down c.AnacondaServerAuthenticator.client_id = "jupyterhub"
Here is an example showing where you can find the lines to comment in and what it will look like when integrated correctly:
Save your work and close the file, then restart your JupyterHub by running the command:
sudo systemctl restart jupyterhub
Verify the status of your JupyterHub is
runningby running the command:sudo systemctl status jupyterhub
Add your Anaconda Server administrator user to the JupyterHub instance.
adduser anaconda
Navigate to your instance of JupyterHub in a web browser and log in using your Anaconda Server “anaconda” user credentials. If you are already signed into Anaconda Server, JupyterHub will open automatically when you attempt to sign in.